Showing posts with label stampin up. Show all posts

1.03.2012

Mixed Bunch Easel Card

The second card I created for the Occasions Mini swap is an "easel card" which is great for displaying on a table. It has a special fold, a layer of cardstock and a little embellishment to allow it to stand on its own. Stay tuned for some Sale-a-Bration 2012 card swap samples!

1.02.2012

Tea for Two Card

This is a multi-layer full card I created for an Occasions Mini 2012 swap. I am often inspired by the color schemes of designer series paper (DSP) and continue the colors throughout a card layout. Here, I have used Riding Hood Red, Blushing Bride, Pear Pizzazz and Whisper White cardstock, Baja Breeze, Basic Grey and Riding Hood Red classic ink, new Big Shot dies, Lucky Limeade Baker's Twine, designer buttons and basic pearls.


12.30.2011

Sale-A-Bration 2012 is almost here!


From January 24, 2012 through March 31, 2012, Stampin' Up! will have the annual Sale-a-Bration promotion! You can earn an exclusive SU stamp or product for each $50 (not including tax & shipping) you spend. Check on my website (tag.stampinup.net) for more information and fun stampin' stuff!

In celebration of Sale-a-Bration, I am re-designing my blog. I feel it is overdue and I look forward to a new chapter in my Stampin' Up! endeavors.

A Backlog of Card Samples!

Picasa SlideshowPicasa Web AlbumsFullscreen


Here are samples of cards and other small projects created with Holiday Mini 2011 stamps and products. Most (if not all) items were swapped during another downline meeting.

10.08.2010

You Take the Cake!

StampinUpPartyHearty

StampinUpCakeDie

What makes the Party Hearty Stamp Set lovable? You get cupcakes, candles, a present, images that can easily be punched out and great sentiments. For this card, I decided to add a surprise inside created with the Three Tier Cake Pop -Up Bigz Die! This cheerful birthday card uses a combination of pumpkin pie, daffodil delight and old olive. The cake tiers have Greenhouse Gala designer series paper.

9.28.2010

Candy Wrapper Bigz Die Treats

christmas holiday stampin up candy wrapper bigz die

If you have ever wanted quick, neat treats to place in a basket as party favors, set at each table setting or to give as Halloween gifts, the Candy Wrapper Bigz Die works like a charm! It is one of the newest Big Shot dies available exclusively through Stampin' Up! It cuts AND scores at the same time, so all you have to do is fold, glue and decorate as you wish. Check out my promotions if you would like to learn more in a Big Shot Class or a Holiday Card Class. I also have a Special for Fall/Winter 2010.

The two samples above were created with the Bells & Boughs stamp set, Deck the Halls Designer Series Paper and Designer Fabric, Decorative Label Punch, Scallop Oval Punch, Early Espresso classic ink, Watercolor Wonder crayons, Sahara Sand, River Rock, Whisper White and Crumb Cake Cardstock.

9.24.2010

Christmas Card with "Bells and Boughs"

stampin up christmas card bells and boughs

This card was created for a holiday wow swap recently. Participants had to make cards with at least 4 layers of cardstock, 3 different embellishments and a stamp set from the Holiday Mini 2010. I used Stampin' Up!'s Bells and Boughs stamp set, Sahara Sand, Old Olive, River Rock, Early Espresso and Whisper White cardstock, Supernova Fine Stampin' Glitter, Basic Pearls Jewel Accents, Decorative Label Punch, Scallop Oval Punch and Cherry Cobbler Seam Binding Ribbon. I stamped the holly background with Old Olive classic ink and colored in the bells with watercolor crayons.

9.19.2010

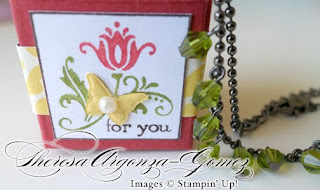
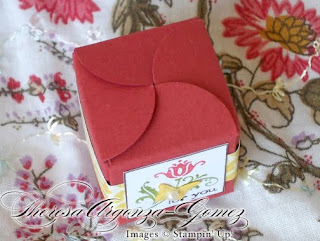
Mini Box (Created with the Petal Card Double Punch)

stampin up petal card double punch mini box

Here is a little idea for a cute stocking stuffer, birthday present, tooth fairy box, or gift box.

Take four punched pieces using the Petal Card Double Punch, and glue each of the side flaps together. The side flaps should be folded toward the interior of the box. (If you prefer the inside of the box to be as flat as possible, you may want to snip off one petal flap from each punched piece and glue side flaps to interior sides of the box.)

To close the bottom of the mini box, fold each consecutive petal flap down, tucking part of the last flap beneath the first to hold it in place. Repeat this to close the top of the box. (You can also glue the bottom flaps, if you like.)

The finished box will be approximately 1" length x 1" width x 1" height. You can fit a bracelet, necklace, earrings, simply adorned creation, a Hershey's "hug" and "kiss", a tooth for the tooth fairy, a folded dollar bill, tiny candies, a mini book, a keychain, a magnet, a rolled up message, or anything small that you can think of!

This box was made with riding hood red, daffodil delight and whisper white cardstock, Greenhouse Gala designer series paper, Cute by the Inch hostess stamp set, riding hood red, old olive and early espresso markers, beautiful wings embosslits die and basic pearl. A lady at Convention 2010 swapped a simply adorned insert for one of my 3D items and I thought it would be great to use the same color scheme for this box.

The more punched petal cards you adhere together, the larger the box can become. My next project may be a flower-shaped box created with the punch. Stay tuned!
stampin up petal card double punch mini box

9.15.2010

"Joy-fold" Card with Stampin' Up's Aviary Stamp Set

I recently created this card (with 8 layers) using the "joy-fold" technique. Splitcoaststampers offers a tutorial. I decided to use bright, cheery colors: concord crush, real red, tangerine tango and pretty in pink. The sentiment is layered with an oval punch and designer label punch. When you lift the "my friend" tab, the panel with birds swings open. A message can be written inside.

stampin up aviary card
The card is embellished with basic pearls and 5/8" pretty in pink satin ribbon. I also used the Elegant Lines Textured Embossing Folder and Dotted Scallop Ribbon Border Punch, which are exclusive to Stampin' Up! and just came out in the 2010-2011 Idea Book & Catalog.

9.04.2010

Designer Fabric "Yo-yo"/Ruched Circle Tutorial

S T E P S

Use a 1-3/4" Circle Punch to make a cardstock template if you want to create the same size Yo-yo in this tutorial. Place the circle on the back side (unprinted side) of some Candy Cane Christmas designer fabric and trace around it. Cut out the fabric circle.

Tip: You can also use your Big Shot and Circles #2 Bigz Die to easily die-cut circles from fabric.


Thread a needle and tie a knot on the edge of the fabric circle. Run the needle in and out of the edges. This is called a "running stitch" or "straight stitch."


Continue stitching all the way around the fabric circle. Pull on the thread to gather the fabric edges.


Tie a knot on the back to secure.


Use one tip of your paper snips to gently poke a hole through the center of the Yo-yo/Ruched Circle. Be careful not to cut the thread holding the fabric together. Insert a glimmer brad or other type of brad.


You can use Yo-yos/Ruched Circles to decorate a card, cloth napkins, blouses, sweaters, towels, hairclips or anything else you can think of! I am planning to use these to accent some Holiday Mini Catalog card swaps.